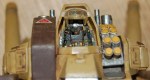
Armored Trooper VOTOMS is just about my favorite ‘real robot’ anime ever. The plot has both down to earth grittiness and real world action, and an interesting blend of space opera elements. The main robot in the series is the mass produced ATM-09-ST Scopedog. The Scopedog is the epitome of the walking tank mecha ethos, and is used in some fashion by almost every armed force in the VOTOMS universe. The Scopedog in its basic form is a line-standard machine, and has the capacity to be upgraded with many different mission packs and specific equipment including a parachute, a space maneuverability pack, and extra weapons (LOTS of weapons).
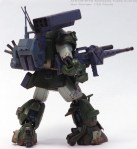
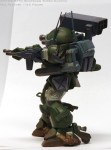
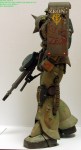
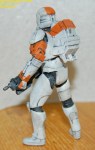
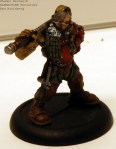
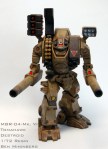
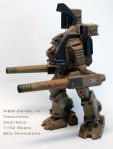
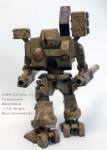
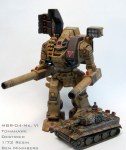
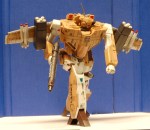
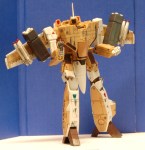
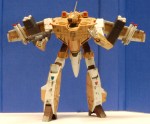
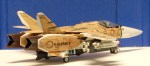
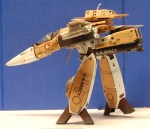
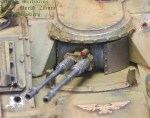
The Scopedog Turbo Custom ATM-09-STTC is the main machine used in the movie The Last Red Shoulder. Without spoiling anything from this fantastic series, the Red Shoulders are an infamous special forces unit what a record of brutality and mercilessness. Main character Chirico Cuvie and his military companions have a score to settle with the Red Shoulders, and use the custom modified Turbo Custom units in their fight. The Turbo Custom is named for its extra maneuverability and upgraded booster package for ground combat. Most AT units in VOTOMS have some form of wheeled propulsion built into their feet, enabeling them to basically skate around in combat, and with its upgrades the Turbo Custom does it better. Each pilot in LRS also equips his machine with extra weapons, including shoulder mounted missile launchers and waste mounted armaments.
Max Factory makes a series of approximately 1/35 PVC highly articulated action figures for VOTOMS. These figures are typically overpriced and not the most durable figures in the world, and the sculpt is far from perfect (the head is faaar too big). I got the Turbo Custom on deep discount and decided to enhance the paint job on it, as in general the figure is still alot of fun. Minor details were painted in, included some hand painted markings, and then I went on to weathering, including chipping and dirt using acrylic paints. I did not go nuts on the figure as I still wanted it to be mostly play with-able after customizing it. Even tho the MF figures are made of PVC and sometimes need a little tweaking out of the box to tighten joints, I still recommend them above the CMS Corps figures, which are made of cheap plastic and nowhere near as durable.
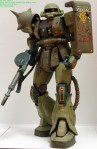
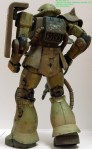
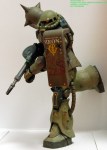
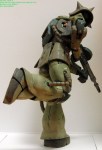
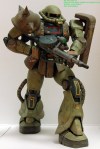
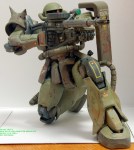
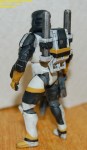
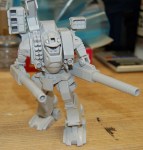
The Zaku II from Mobile Suit Gundam and just about every Gundam production thereafter is one of my favorite mecha designs of all time. Fortunately Bandai’s Master Grade 2.0 is one of the most amazing pieces of gunpla I’ve ever worked with. The 2.0 MG combines Perfect Grade detail levels, including a full mechanical skeleton, with an insane focus on articulation, allowing the Zaku to achieve some truly natural looking poses. This rendition of the big one-eye has received some flak for its retro vibe, but I consider it a pretty definitive representation, combining the bulkiness of the original animation with a little extra sleekness and mean-ness and emphasis on functionality.
From the get-go I knew this was going to be a fairly heavily weathered model, as I really wanted to focus on the walking-tank aspect of this ground combat machine. However, after watching the first episode of MSG MSIgloo 2, I think my weathering is pretty take! I built the kit Out Of the Box with a few exceptions… the shoulder spikes were replaced with Adler’s Nest turned metal parts, as was the camera mono-eye fixture and the machine gun barrel. Form there I went to painting… the internals were all over brushed with a dark dark-grey, and then from there I only really focused on parts that would be visible once all the armor was attached… one of the biggest ‘problems’ I have with gunpla kits with full interiors is that I always go overboard working on the interior, which is never visible, and often messes up the fit of some of the parts when attaching the armor and whatnot. On all the visible areas (mostly around the joints) I added dry brushing, oil work, and fully painted piston parts. I also fully painted the cockpit and pilot, but I don’t have enough of a light setup to effectively photograph in there…
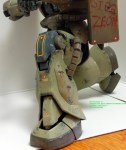
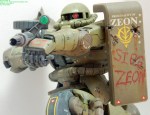
The external parts were base coated with acrylics shot through my GW spray gun… the light green was a custom mix, and the darker khaki color was a stock P3 paint (the Privateer Press Paints line features FANTASTIC drab army-type colors). The black bits were hand painted, and the two sets of green parts received something new for me… I used the spray gun on its finest nozzle setting to over spray some highlights to the parts. There’s not alot of highlight showing up once the kit is fully weathered, but it definitely added to the affect, and really, a single technique like that shouldn’t be readily picked out from a finished model. All of the parts then received a coat of Future through my spray gun, and I assembled the bulk of the armor on the skeleton. Next step was decals… lots of decals. I bought the Bandai water slide decal sheet for this kit (kind of a racket selling real decals separately, but they’re only four or five dollars a sheet, and phenomenal quality). I aimed for a marking set similar to the ‘Real Type’ Zaku design used by Bandai, including the striping, which all had to be done from individual line decals and trimmed to shape. All of the decals received a tough of decal softening solution to snuggle them all the way down to the gloss surface, and a coat of future brush painted on to smooth out the edges of the carrier film. I added the graffiti, which I had been planning to do from the start… I figure this guy’s been on Earth for a while now, and the Federation has probably started to rally its forces, so the Sieg Zeon would be like a rallying call for the Zekes. Once all the decals were set, the whole model recieved a matte varnish coat so I could start weathering. I did some initial dry brushing to weather the decals a bit and pick out the edges of some details. I added some surface discoloration filters using oil colors blended into the surface, and added rust streaking and panel lining in a similar manned (obviously less blended in). A bit of battle damage was carved into the model using an X-Acto blade, and I painted in this damage with dark grey and metal colors, and then added rust streaking to some of the wounds to make them look like older battle scars. Form there the model received some more matte varnish, and the dust and dirt on the legs and feet, done with some weathering pigments for the mud and tan Valeijo acrylics for the dust, done in a number of very thin washes. The accessories were finished (the Zaku also has a Heat Hawk close combat weapon, and a big bazooka which I did not bother to photograph, and optional leg-mounted missile launchers which I didn’t assemble.) I’m really satisfied with how this guy came out, and am thinking about adding some similar weathering to my big 1/35 Jumbo Grade Zaku to help it fit in with my 35th scale tank kits.
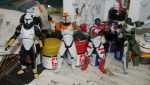
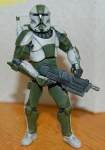
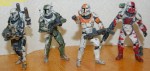
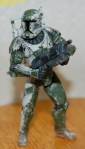
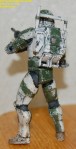
Star Wars Republic Commando was a squad-based shooter that came out a few years ago and introduced the idea of ‘wetworks’ Clone Troopers to the SW universe. Delta Squad was the unit featured in the game, consisting of Boss, the squad leader, Fixer, the squad techie, Scorch, the demolitions guy, and Sev, the scary mean sniper guy.
I received a commission for a pair of Clone Trooper squads repainted in the Republic Commando team scheme from the video game. One set of 4 will be parade clean, and the other will be in action weathered and beat up looking. The customer asked if I would do a WIP blog as I worked through the sets, and I thought this was a neat idea, and something I’ve never done before, so this is gonna be a learning experience for all of us. (This was posted to another site first, and is re-posted here for posterity.)
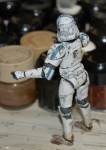
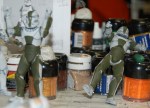
I asked the customer for an extra generic trooper figure so I could test techniques and the chemical reactions of all the paints and such… sometimes softer plastic figures react funny to paint, but I’ve gotten some advice on what to use to prevent this, so this first guy will be my test bed figure… a second generic was also provided, and both will be finished up as extra detailed generics for the customer.
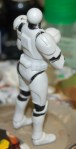
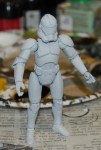
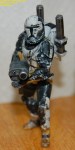
First two pics just show my first vic…er volunteer! All that’s happened in this pic is that I used some files and sandpaper to clean up mold seams on the figure, and get to know the sculpt.
The second pair of pics show our hapless trooper after primer and a base coat… there’s a few spots to touch up with a brush, and I need to get more canned air, but this is the base color I whipped up, and made enough for all the figures I received (and maybe more). Right now the base color looks a bit dark and grey, but this allows me to build up the white color a bit and add some depth, and then I can work from there… the tonal value of the figure will change as I work through the weathering and such as well, and since I want to test all of the products I’ll be using, this first guy will get plenty beat up.
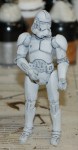
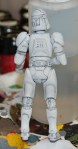
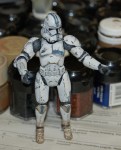
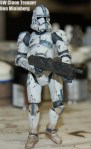
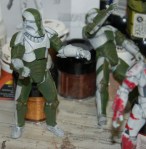
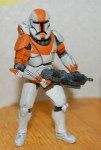
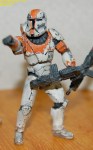
Pics 5-14: Alright, Sgt. Test-bed is just about done… the first couple pics show him with the quick and dirty Clone Trooper-esque markings I threw on, and the rest show the figure in its current state… only thing left is a coat or two of Future to seal all the paint (especially on the joints) and seal the paint to the plastic, as I still don’t know if I can trust the chemicals on the soft plastic, and as Future is an acrylic finish, it basically makes a shell over the paint that keeps it in place and prevents any reactions… after that I’ll throw on another matte coat and maybe a few metallic scratches and gloss the visor. Let me know what you guys think, as this is what I’m thinking the RC figs should basically look like… I tried to keep the Lucas-ey palette… troopers and the like have a pretty limited color palette on their armor… it doesn’t rust or streak, but it gets dinged up.
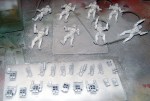
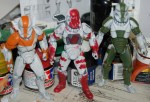
Pics 15- 17: Alright, proof that this project continues… first shot is Srg. Testbed 100% done, posing with someone else’s gun. Next two are the beginning of the actual commission… two sets of Delta Squad. Second pics shows their current condition, sanded and primed… tomorrow’s supposed to snow alot, so there’ll be plenty of time stuck inside to spray the base color and go from there. Hopefully I’ll get all the gear cleaned up and primed tomorrow as well. What I find amazing is that the testbed figure, which had an action gimmick using the legs, and therefore no hip articulation, still managed to have better posability than the commando squad figs, which I assume were some special limited set? This works out much better for me, as the biggest problem on Srg. Testbed was paint wear on the joints… the only multi-joint like on Testbed is the elbows on the commandos… otherwise, they’re shoulder swivels and hip swivels with no knees or ankles… they do have a nice ab ball joint, but it’s not looking to be a problem for the paint.
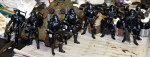
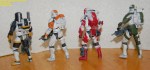
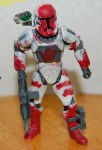
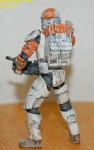
Pics 18-32: These shots show the two Delta Squads as they progress. The individual techniques are the same as for the test trooper (above), along with painting each member’s individual markings.
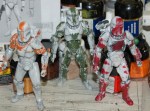
Pics 33-51: The two Delta Squads completed. The chipping is a bit overdone on the battle-worn squad, but the customer was happy.
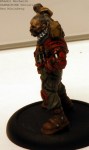
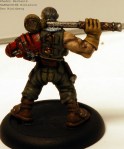
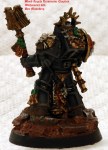
Privateer Press’s landmark miniature game WARMACHINE is a world of full-metal fantasy. Magically inclined Warcasters control forces of steam-powered mechanikal Warjacks, while armies fight under their command with steampunk-esque technology. Khador is the nation based on imperial/Soviet Russia (no communism).
The squad leader of the Khador battlefield mechaniks is one of the coolest single miniatures ever. His mechanikal arm is amazingly detailed, and looks totally functional. He’s got a great deal of detail on jis jumpsui,t as well as a fantastic headsculpt. I had a blast working on this guy, using acrylics with a couple of oil washes on the arm IIRC.
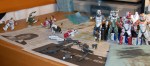
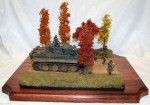
Along with the sci-fi stuff, I really enjoy doing historical armor work. This is Tiger I number 332 of the Schwere Panzer-Abteilung 503 “Feldherrnhalle” on maneuvers near Bjelgorod, Russia. This is the 1/48 scale Tamiya Tiger I with the Voyager PE set and Tamiya figures and accessories.
This diorama is based on two sets of photos from the reference book Tigers In Combat I, one set showing a number of closeups of Tiger 332 being pulled from the mud, allowing for a very comprehensive set of closeup walk-around photos to allow maximum accuracy in the details. The other photo is the basis for the dio, of Tiger 231 from the same unit leaving a staging area in Bjelgorod on a dusty road in August with some rather casual looking infantry moving along with it.
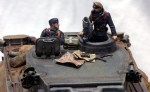
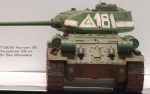
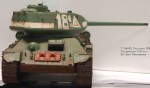
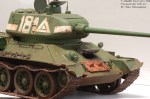
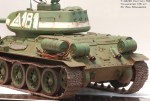
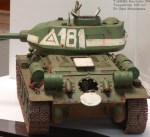
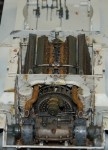
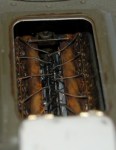
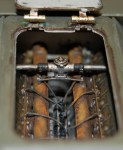
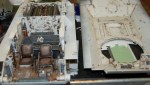
The T-34 was the primary tank of the Soviet forces in WWII, and it saw a great many revisions during the war as technology and production advanced. The T-34/85 is armed with the later 85mm gun, and wa sa common sight on the Russian Front.
Trumpeter produces a series of T-34s in 1/16 scale, which is fairly enormous… the chassis of the tank is about the size of a shoebox (the T-34 is not that big of a tank). These mammoth kits have complete interiors and fully working suspension. I spent a great deal of time on the interior, even though some of it will never be seen again now that the model is all assembled. I made all of the hatches workable, including adding a hinge for the large engine hatch so that the interior can be viewed. There are WIP pics here of the interior when it was completed before I closed up the kit, to prove all that detail is really there! The kit features fully articulated spring-loaded suspension with workable tracks, so I made sure that my weathering for the running gear and tracks was realistic and allowed the suspension to remain workable. The only upgrades I made to the kit were a turned aluminum gun barrel, the engine hatch hinge, wiring for the sparkplugs on the engine, and photoetched front fenders. I’m still waiting for someone to release figures for this kit… it could really use a crew!
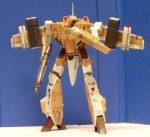
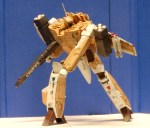
The Tomahawk is one of the non-variable Destroid mecha from the original Super Dimensional Fortress: Macross. The Destroids are the second-string machines in the show after the variable VF-1 Valkyries, and are often shown on defense and meat-shield duties (or so it seems)!
This is a 1/72 scale garage kit of the Tomahawk. Out of the box this kit was meant to be static once assembled, but I did some hacking and slashing and gnashing of teeth and made it articulated with polycap and ball-type joint option sets and leftovers from Gundam models. The designer of the kit was astonished at how far I took his creation.
I finished the Tomahawk more recently than the Gundam MkII, after spending some time doing historical models (pics to follow)! I spend a great deal of effort trying to translate techniques from armor modeling to sci-fi and mecha, and this is one of my earlier successes. Paints are mainly Tamiya acrylics, with oil work and pigments added for effect. The WIP shots show some of what I did to improve the kit, and the little tank in some of the finished shots is an in-scale Tiger I.
The VF-1A is the most basic model of the VF-1 Valkyrie from SDFM. The 1A is easily identified by its single head laser. The most common troops received these brown valks, nicknamed the Cannon Fodder by fans, as all they ever seemed to do was die!
This is the Yamato 1/48 VF-1A CF release, with custom decals and a weathered paint job. I did this after the GBP custom, so it’s a little better, but I think the battle damage came out too overdone.
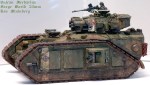
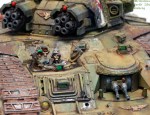
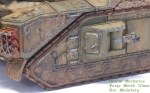
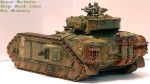
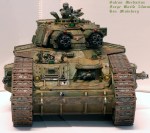
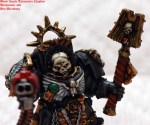
Forge World is the limited model garage-company branch of Games Workshop, and makes high-quality resin models for the mode dedicated modelers among the GW masses. The Vulcan Mecahrius is a super-heavy tank used for breakthroughs and heavy support. I was really inspired by ImpterialArmor:Masterclass, a modeling book released by the Forge World artists, and tried out a few things I picked up from that tome, including more oil work, and more layering. I’m really happy with the results, and think it’s my best armor model so far, and am interested to see what people think… this is around the standard I want my SM tanks to look at the end if the day, and I’ve got a detailed Rhino awaiting exterior paint, so we’ll see how these ideas hold up.
I converted the commander to have one hand on the stubber and the other pointing, as I’ve got a DK flamer team to go with this model, and I may end up doing a diorama base for the two models.
I also got some good use out of my GW spray gun early on… the base color green is custom mixed, and was sprayed to save alot of time and preserve the surface detail. What might surprise some is that the camo color was sprayed on as well… obviously you can’t do very fine squiggly camos with the SG, but for a nice broad banded camo, it worked to great effect. From there I some detail work and started the weathering, including acrylic work for shipping, oils for surface discoloration, dirt, grime, rust, oil, and fuel staining, and pigments and acrylics for the mud and dirt and the tracks.
This is really one of GW‘s best models ever… he’s big, mean, imposing, and incredibly detailed. Alot of fun to paint… This guy is my warm-up figure after being out of mini painting for a year or two in lieu of historical and sci-fi models. I used Andrea Color’s black paint set for the armor, with a mix of Valeijo colors and mediums, and GW and P3 paints. He’s got alot more blending than I’m used to, and it shows in the closeup photos and harsh lighting, but this is all I’ve got here at college. The weathering was done with MIG Production dry pigments on the base and model.