
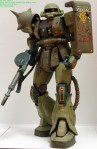
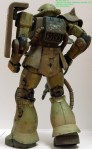
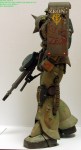
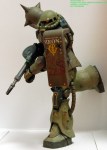
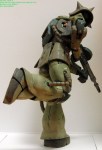
The Zaku II from Mobile Suit Gundam and just about every Gundam production thereafter is one of my favorite mecha designs of all time. Fortunately Bandai’s Master Grade 2.0 is one of the most amazing pieces of gunpla I’ve ever worked with. The 2.0 MG combines Perfect Grade detail levels, including a full mechanical skeleton, with an insane focus on articulation, allowing the Zaku to achieve some truly natural looking poses. This rendition of the big one-eye has received some flak for its retro vibe, but I consider it a pretty definitive representation, combining the bulkiness of the original animation with a little extra sleekness and mean-ness and emphasis on functionality.
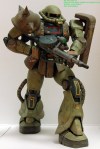
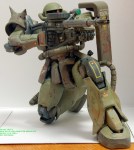
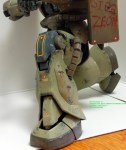
From the get-go I knew this was going to be a fairly heavily weathered model, as I really wanted to focus on the walking-tank aspect of this ground combat machine. However, after watching the first episode of MSG MSIgloo 2, I think my weathering is pretty take! I built the kit Out Of the Box with a few exceptions… the shoulder spikes were replaced with Adler’s Nest turned metal parts, as was the camera mono-eye fixture and the machine gun barrel. Form there I went to painting… the internals were all over brushed with a dark dark-grey, and then from there I only really focused on parts that would be visible once all the armor was attached… one of the biggest ‘problems’ I have with gunpla kits with full interiors is that I always go overboard working on the interior, which is never visible, and often messes up the fit of some of the parts when attaching the armor and whatnot. On all the visible areas (mostly around the joints) I added dry brushing, oil work, and fully painted piston parts. I also fully painted the cockpit and pilot, but I don’t have enough of a light setup to effectively photograph in there…
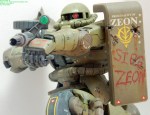
The external parts were base coated with acrylics shot through my GW spray gun… the light green was a custom mix, and the darker khaki color was a stock P3 paint (the Privateer Press Paints line features FANTASTIC drab army-type colors). The black bits were hand painted, and the two sets of green parts received something new for me… I used the spray gun on its finest nozzle setting to over spray some highlights to the parts. There’s not alot of highlight showing up once the kit is fully weathered, but it definitely added to the affect, and really, a single technique like that shouldn’t be readily picked out from a finished model. All of the parts then received a coat of Future through my spray gun, and I assembled the bulk of the armor on the skeleton. Next step was decals… lots of decals. I bought the Bandai water slide decal sheet for this kit (kind of a racket selling real decals separately, but they’re only four or five dollars a sheet, and phenomenal quality). I aimed for a marking set similar to the ‘Real Type’ Zaku design used by Bandai, including the striping, which all had to be done from individual line decals and trimmed to shape. All of the decals received a tough of decal softening solution to snuggle them all the way down to the gloss surface, and a coat of future brush painted on to smooth out the edges of the carrier film. I added the graffiti, which I had been planning to do from the start… I figure this guy’s been on Earth for a while now, and the Federation has probably started to rally its forces, so the Sieg Zeon would be like a rallying call for the Zekes. Once all the decals were set, the whole model recieved a matte varnish coat so I could start weathering. I did some initial dry brushing to weather the decals a bit and pick out the edges of some details. I added some surface discoloration filters using oil colors blended into the surface, and added rust streaking and panel lining in a similar manned (obviously less blended in). A bit of battle damage was carved into the model using an X-Acto blade, and I painted in this damage with dark grey and metal colors, and then added rust streaking to some of the wounds to make them look like older battle scars. Form there the model received some more matte varnish, and the dust and dirt on the legs and feet, done with some weathering pigments for the mud and tan Valeijo acrylics for the dust, done in a number of very thin washes. The accessories were finished (the Zaku also has a Heat Hawk close combat weapon, and a big bazooka which I did not bother to photograph, and optional leg-mounted missile launchers which I didn’t assemble.) I’m really satisfied with how this guy came out, and am thinking about adding some similar weathering to my big 1/35 Jumbo Grade Zaku to help it fit in with my 35th scale tank kits.


Leave a comment