

‘I think we took a wrong turn!’
I was asked by a friend to build and paint a 3D printed kit of the Millennium Falcon cockpit for 6″ Star Wars Black figures he had purchased. The kit is huge and features some key interior elements, but I found the overall detail and finish of the kit left room for improvement. Cut to eight months later and I’d completed the longest and largest project I’ve undertaken since the printed Warlord Titan (which I’ve apparently never posted on here?). Click below for a walk through of the build process, the additional 3D printed parts that I made, and the painting process!

When I opened the box I knew I was going to want to do a lot of work to this kit to make it the best display piece possible. The basic gist was there, but there was plenty of room for punch up. I got to dry-fitting to see what I was dealing with.


Let’s take a second to talk about PLA plastic. It’s terrible. It might be easier to print on cheaper printers than ABS, but every PLA I’ve worked with is hard, brittle, and miserable to work with. It’s always covered in nozzle strings, but that’s just as much an issue of the printer and operator than the material. It’s just so difficult to putty and sand due to the hardness of the plastic. I quickly decided anything I could re-draw and print myself in ABS would be the quicker option because then I could acetone-smooth the parts and use my normal glues and techniques. Going forward in the pictures, anything in yellow or black plastic was designed by me and printed in ABS.


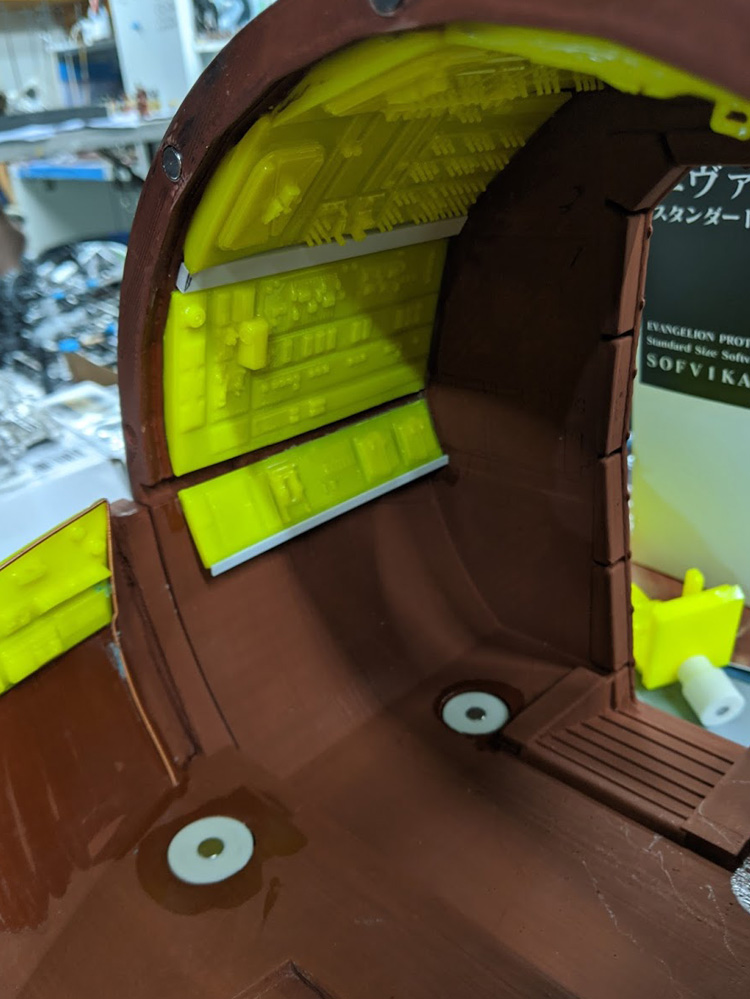
After an initial pass at sanding the exterior and the first coat of primer, I decided the interior surfaces needed a complete overhaul. The kit had some detail designed into the interior surfaces to represent all the consoles and switches and greeblies of the cockpit, but they were printed integral to the cockpit body so none of the details were printed in their optimal orientation. I see this all the time with 3D printed products and don’t get it. It’s so easy to cut your designs up into more parts that can be printed on their best facing and fit together afterwards but 3D modelers just slap all the details on one big chunk and slam it out the printer, detail or surface finish be damned. It takes a little more work upfront to make your pieces smarter, but it saves so much time in finishing and results in a much better product. Or just keep pumping out crap on Etsy that makes people wary of 3D printed kits I guess.

First new part was a set of caps for the nose. These served two purposes- they provided the correct contour to the nose face, and they covered a ton of surface that I didn’t want to putty and sand! The conical canopy pieces had been printed with the nose as the bottom surface which meant the ugliest printed surfaces were the front face of the finished kit. Solid.

Then it was on to interior panels! I ground down the entire inside of the cockpit ring with a rotary tool and made new panels to act as a replacement skin. Remember what I said about cutting your designs up so you could print at the best orientation for your detail? I made a selection of separate panels so each could be printed flat for the sharpest details and decided I’d worry about how they fit the interior surface afterwards. Better to start with the best possible bits and use some elbow grease to bring it together than trying to spend eternity fixing up a lousy starting point.


The panels all fit with some trimming and an unhealthy amount of superglue. You’ll see later in the process that this is where I made my main mistakes. First, I didn’t account for the light bars that run between the side panels and had to add those later. Second, I should have trimmed each piece to fit but not installed them so I could paint each panel flat on my workbench. The end product suffered because I had a hard time reaching into the cockpit to paint all the console trim and details.


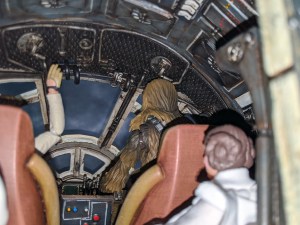
The canopy interior was nonexistent on the starting kit so these parts were all new from scratch. I started with a textured surface panel for the overhead details and then made separate little greeblies that I could glue on. I wasn’t going for 100% accuracy with any of these details but wanted to make sure all the major bits was there and one of the key things we identified as being a must were some overhead levers for figures to reach up to. Han and Chewie are constantly reaching over their heads to make adjustments in the films. The yellow side panels were also all new and served the added benefit of providing some additional support and alignment for the canopy to sit against. I added big magnets to hold the canopy in place, the kit did not include any accommodations. I also added bits between the canopy frames that would later get plumbed with wires.

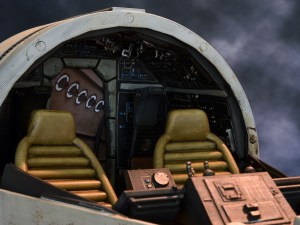
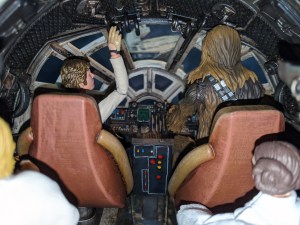
I didn’t want to putty and sand the seats so I made new ones instead. I’m not sure the shape of my front chairs is quite accurate, but my navigator seats have way better detail. I installed all the chairs with magnets so they could be removed to fit figures and swivel with new posts and mounts.


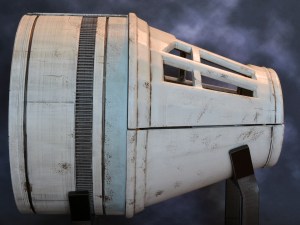
Next up was adding some missing cross-pieces to the canopy frames. These are pretty key for the interior silhouette when looking through the window from the inside.


I plumbed the interior with guitar wire of various sizes. There’s more I could have done here but there’s only so much you can actually see once everything’s together.


The final details to make were replacing some fragile bits on the center console. On the original kit the control yokes and those tiny levers were all one piece as part of the control surface print. This is really dumb. Most of these tiny bits were broken off because of course they were, being tiny details printed at odd angles. The new yokes are printed for maximum strength, aided by the acetone process. The levers are printed in resin and fully hollow so I could run a steel rod through the entire length and into the console. They’ll never break and I left them unglued where they fit so there’s a little play when setting up figures.


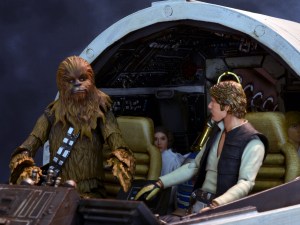
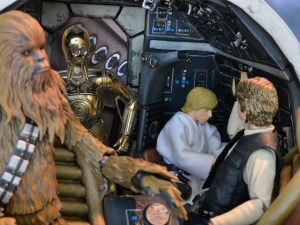
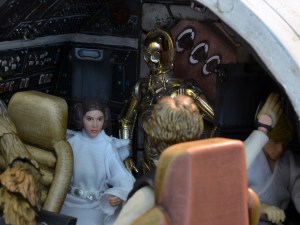
With all the additional parts done it was time for a test fit! I ended up with a rather eclectic crew of whoever was around at the time…

The painting process took much less time than the build, but required a lot of research to figure out what was actually going on in there.


Then I remembered just how extensive the panel trim was… this took forever and left room for improvement. An alternative could probably be to use some kind of decals measured and cut to fit around everything, but I’m not sure that would be any easier. Fortunately the weathering steps helped blend in the trim a bit, but it’s still the weakest part of my paint job. The finished effect with figures in place is so busy that the mistakes don’t stand out as much, but I know they are there.


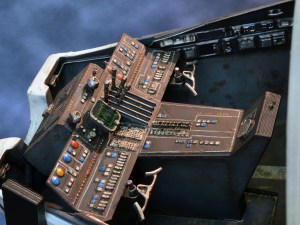
Trim, lights, buttons, switches, panels, doo-dads. There’s stuff everywhere inside the Falcon cockpit and I didn’t even capture all of it!

Spaceship interiors are usually pretty clean but they go to enough dirty places in the movies that there’s no way Chewie hasn’t tracked sand all over the place.

With the interior paint nearing completion, this monster was starting to come together…
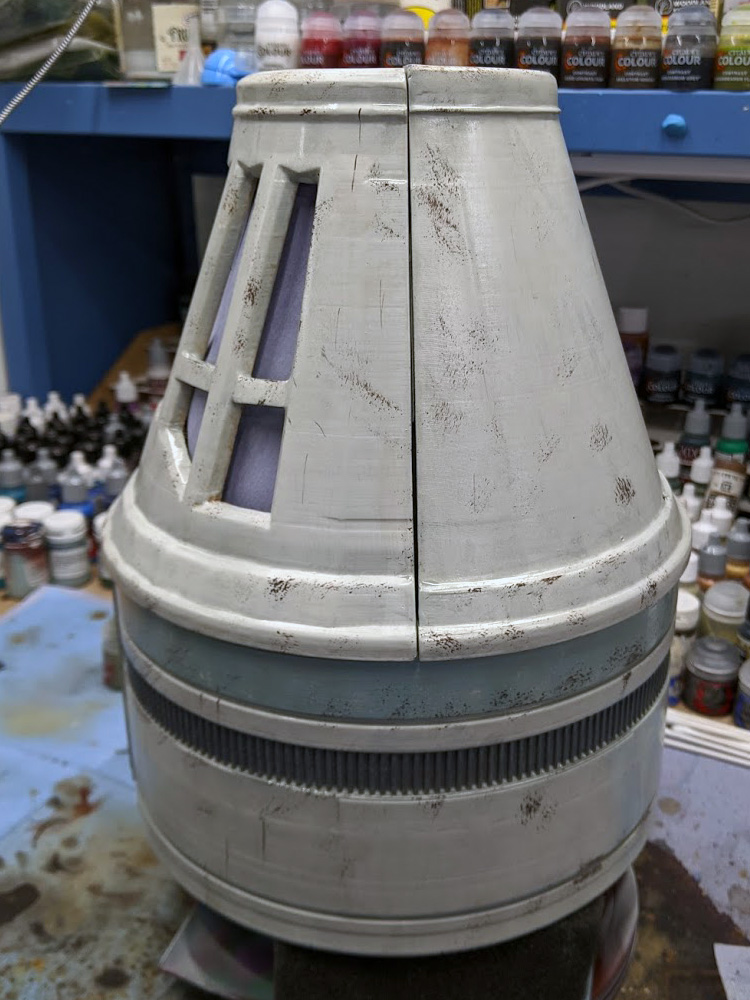


The exterior paint job was much easier! The references vary wildly depending on which movie or model you’re looking at so I picked a couple details I liked between them and ran with it. The subtle blocks of color break up the shape a bit and I kept the actual wear and tear light to help sell the sense of scale.


Finishing off with a printed image to fill the back door, the cockpit was complete! It was time for a proper glamour shoot with a full crew.


Not an easy finished product to photograph but I’m pretty pleased with the end result. More pics in the gallery below!


Can you sell this in pieces for people to build and paint?
Hi Jason, unfortunately I did not make the original kit.
I purchased the same model that you printed plus the front right section of the ship, including the main hold. Every single critique that you made is spot on, it’s like as if when the original designer was building his geometric shapes, in the early stages of blocking out his model, he decided that it was good enough and lots of basic details were left out. I know that he later updated the cockpit to resemble ILM’s designs a little closer but he completely missed the shape of the actual cone, instead, making it more of a cylinder shape. I remember after getting the model that pieces of it were way too big to fit onto an ender3 and when I asked him to split the model up a bit more, I was told that I was going to have do download the software and teach myself how to do it, not being very tech savvy, I found this to be very difficult and abandoned printing the model completely… $100 wasted.
The designer doesn’t take too kindly to constructive criticism and defends his models to a fault, I’ve seen him do this any time someone has called out his bad work.
That is rather unfortunate to hear! I didn’t purchase this so I didn’t worry about providing feedback or anything, but I don’t see how you could defend it next to what else is out there.
Definitely a lesson learned. I now know better of what I’m looking for when purchasing a model. I did stumble through teaching myself how to cut up a model to fit on my bed but I avoid it if I can.
All that said, I know all the hoops an hurdles that you had to hop through to make it look good and you made it look great.
Would you provide or sell stl’s you created?
Hey, sure! If you shoot me an email through the Contact Me link I’ll put together a folder of bits. Just note that they are rough and I just made a bunch of possible bits to then fit to the kit. They aren’t going to drop in cleanly and get you exactly to my final build.