

I’ve been collecting a lot of Star Wars toys lately, and one of the things I was most excited to get was the latest version of Hasbro’s big X-wing. Amazingly enough, the modern X-wing mold’s origin can still be traced back to 1998’s Power of the Jedi 2 Electronic Power F/X X-wing mold. I remember seeing TV commercials for the Power F/X toy back in the day, but never had one. The mold has gone through a number of revisions, but the bones are still the same in today’s X-wing toy. I was thrilled to get a big new X-wing toy, but I was incredible disappointed by the S-foil deployment gimmick when I finally put the toy together. Out of the box, the wings are saggy, loose, and do not deploy evenly. I figured the mechanism could not be that complicated, so I cracked open my new X-wing and got to work. The jist of the mechanism is a lever that depresses a spring-loaded plunger that deploys the wings. The level slides to the side to lock in place, but when slide to the side the lever does not depress the plunger evenly or far enough, so the wings are uneven and floppy. I fired up the computer and designed a new piece and printed it on my 3D printer, going through a half dozen iterations in a weekend until I had a new piece that held the plunger all the way down evenly when locked in place. The ABS plastic part printed on my UP Mini was good enough for me, but not something I was interested in making a number of for others. Instead, I ordered a couple of test prints from Shapeways and found the best one, which is available now in my new Prometheus Rising Heavy Industries Shapeways Store! I may use Shapeways to offer some of my own toys in the future, but for now it is the home of my first third-party toy add-on part. Keep reading after the jump for details on the development, installation, and end result of my X-wing bar.
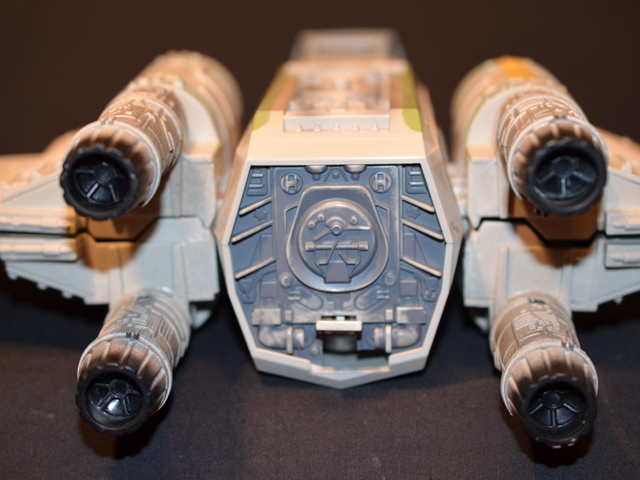
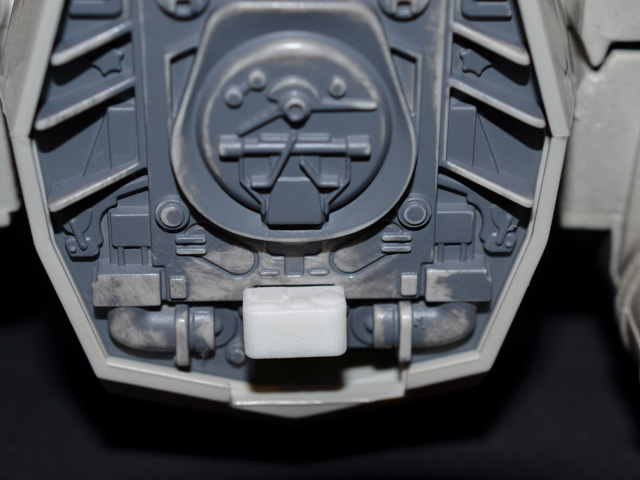
These first two photos show the original part. You can see that the wings are uneven and not fully deployed using the stock lever.

Here’s the guts of the Power F/X X-wing S-foil mechanism. The fulcrum of the lever is a sphere so it can depress and slide to the side to lock in place.
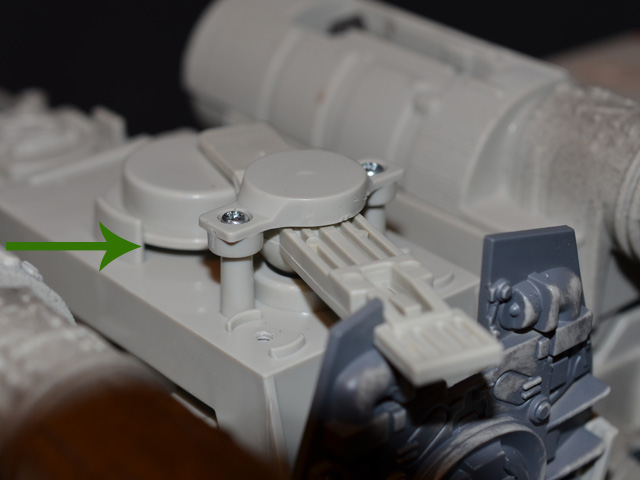
The problem is the lever does not evenly depress the wing plunger when locked in place. Note the gap indicated by the arrow. That slack is what makes the wings uneven and floppy out of the box.

The beauty of having a 3D printer is that I can bang out a whole lot of iterations of an idea in a very short time. By the end of this process, my X-wing’s S-foils could lock in attack formation with the best of them.
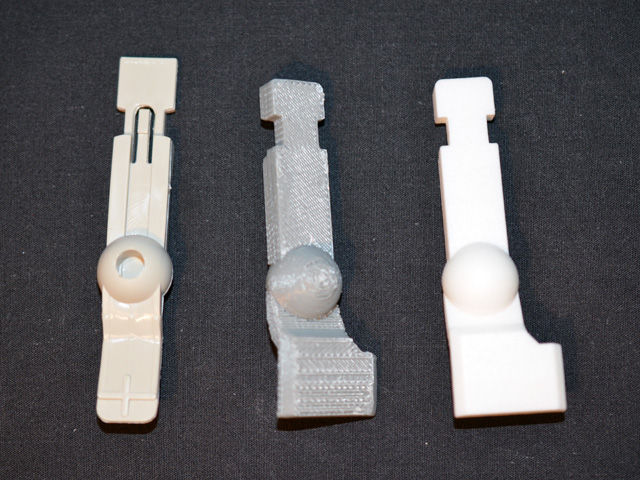
Here’s the stock part on the left, the final ABS printed part in the middle, and the final Shapeways-printed part in Polished White Strong Flexible on the right, available now in my Shapeways store.

Installation is a breeze. There’s two philips head screws to swap out levers, and another seven to open/close the fuselage. In just a couple of minutes you can take your X-wing from sad and saggy to strong and accurate!

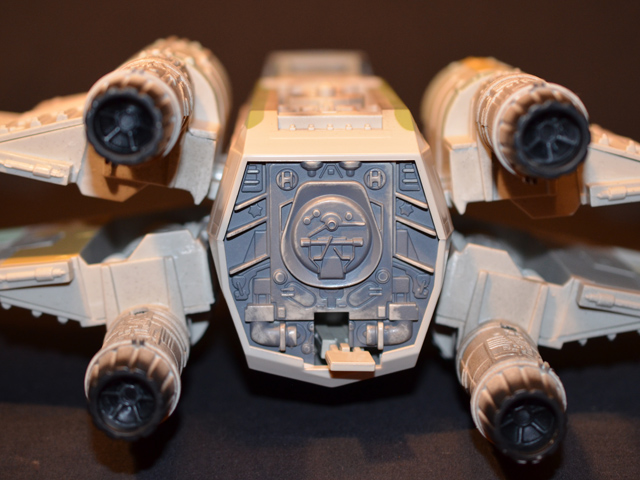
These two photos show the replacement part fully installed. Shapeways plastic takes paint no problem, so with a little gray paint the lever could be made to match the back panel of the ship.

The wings still fully close using the new part.
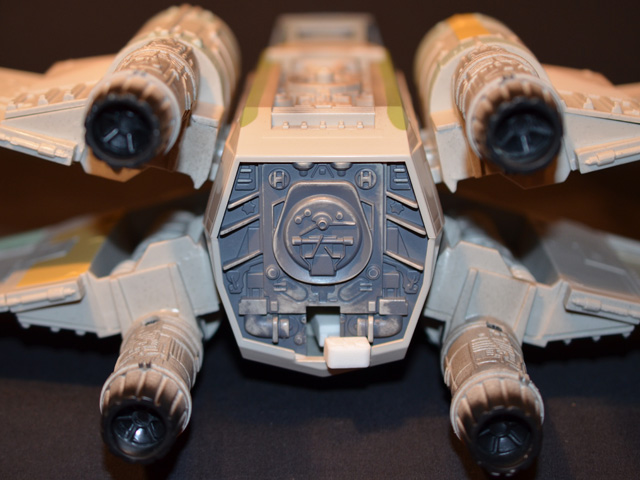
More importantly, the wings now fully deploy and are solid when deployed. The wider end on my part depresses the wing plunger evenly and firmly.

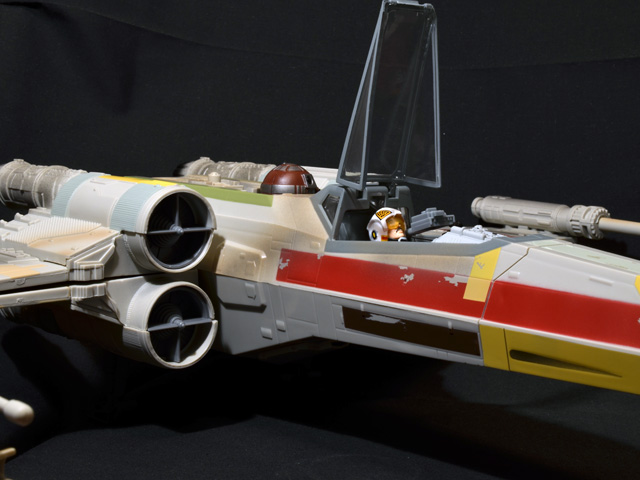
Biggs is ready to take on the whole Empire now that his X-wing can properly switch to attack mode!
Please note that I do not own ‘Star Wars’, ‘Hasbro’, or ‘X-wing’. This is an aftermarket part meant to enhance your official Hasbro toy.

I think we could’ve done with a bit more instructions – I’ve only found 6 out of 7 of these fusilage screws, and the result now is a mishapen x-wing that wont go back together again when I tried to lift the bottom up. Besides the 6 obvious ones, any advice on where the last anchor is?
Hi Stewart,
I’m sorry you are having trouble with your X-wing. Obviously my intention was not for anyone to have worse trouble trying to use my replacement part, so I’m happy to help you out. Based on your description, it sounds like you may not have loosened the screw on the big tab that holds the front section of the fuselage on. I don’t know if you got your X-wing new in the box, but most versions of this toy are packaged with the front section removed. The front will pull straight off if you hold it by the nose and hold the body of the ship with your other hand. Check out this pic, where all seven screws are visible:
http://www.rebelscum.com/Hasbro-Star-Wars/Biggs-Red-3-X-Wing-Fighter-The-Vintage-Collection-TVC-Hasbro/IMAGE8.asp
Please let me know if that helps. If you are still having trouble, please use the Contact Me link on the side to email me directly, and I will try to assist further.
Thanks,
Ben
Perfect! Thanks for this – just like that I’ve done it. Cheers~
Hi there is there any way of making a replacement compartment cover for the hasbro red 3 xwing fighter.
Hi Stephen, I need a little more detail about which part you need. You can reach out to me by email using the Contact Me link on the side if you’d like. Thanks!
Hello Ben, Thank you so much for getting this part out. Just got the 2019 vintage collection Red5 x-wing and of course, it also has the flappy bird issue. Ordered the part from Shapeways and hopefully the NY will start with a much improved wings for this beautiful bird. That’s all. Just wanted to drop a “Thank you” here.
Thank you so much! I’d glad these are still useful to people.
Got the part yesterday, but did not have time, so installed it just now. The wings do open fully so I can finally display it properly in attack mode once the stand arrives from Australia 😁. Well worth the price and wait!
Thank you very much for bringing this part out for those who have the T-65s in their collection.
Hi,
is this part for all Versions of the bigger Versions. The last Red 5 and Blue 1 too?
Greetings! Will you be re-uploading this file to Shapeways once they’re up and running again? I’ve puechsee two of these and had intended to purchase more, tho they closed before I had the opportunity to do so….
Hi Jeffrey,
I need to figure out what I’m doing with the X-wing bar and any of my other Shapeways items. I believe they are now offering print to order services again, but through their Netherlands factory, so shipping will cost more than it used to. I hope to get the part back available, but haven’t had the time to figure out how just yet. Thanks for reaching out!